This guide covers the steps required to create system resources for an access management system purchased through Wesco.
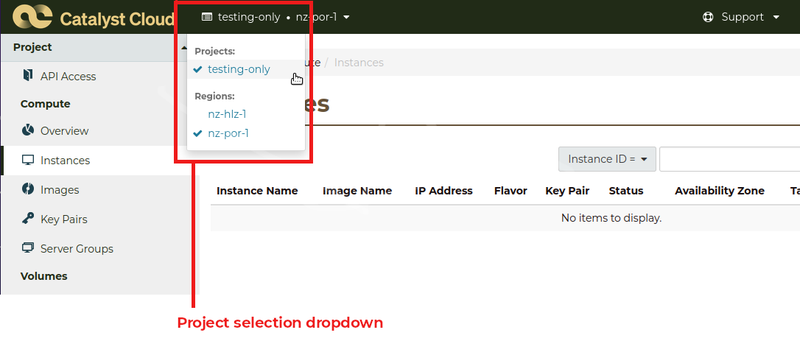
Select project for resources
Log in to the Catalyst cloud web dashboard at https://dashboard.catalystcloud.nz/
Select the customer project to add the new resources to
Select the cloud region to add the new resources in (currently, this should be nz-por-1)
Create disks
This creates the disk space required for the server.
Create operating system volume
Select the Volumes link from the Volumes section of the Project menu.
Click the +Create Volume button (on the right, above the table) to create a new block storage volume.

Enter the details for the new device using the size included in the purchased product, for example, if you purchased a small ACS (SKU CC.ACS.A.WL) enter 128GiB as the Size. You can provide a name and description to aid identification later.
- Volume Name: Windows
- Volume Source: Image
- Use image as a source: windows-server-2022-x86_64 (15.0GB)
- Type: b1.sr-r3-nvme-2500
- Size: Enter the size included with the purchased instance.
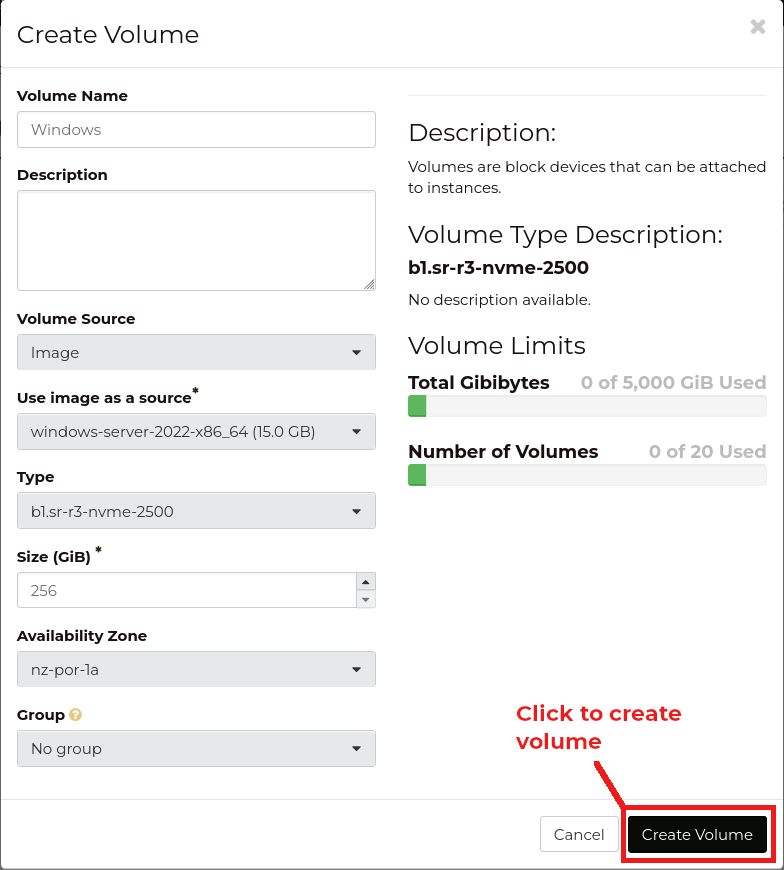
Click the Create Volume button to create the OS volume.
You will now see your new volume displayed in the Volumes table.

Create server resources
This creates the server CPU, RAM, and filesystem (block) storage that you purchased through Wesco.
Select the Instances link from the Compute section of the Project menu.

Click the Launch Instance button (on the right, above the table) to begin the process of defining a new compute resource.
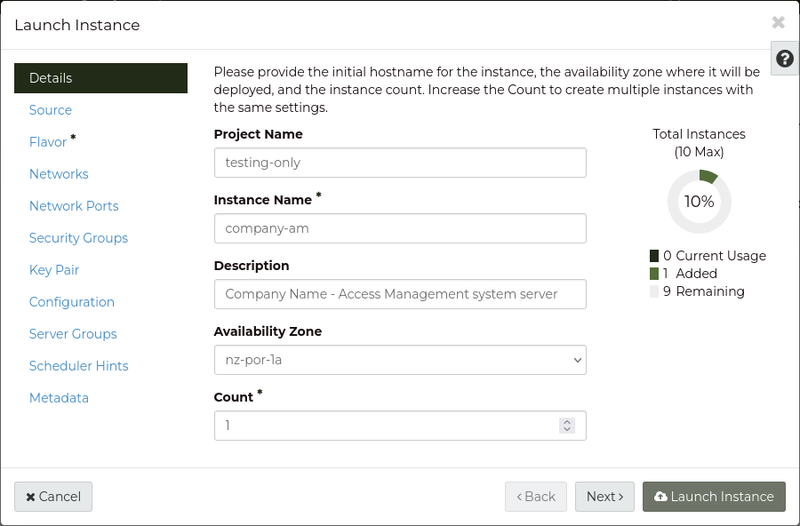
Enter a name and description to aid identification of the resource, then click Next.
Source: In the Select Boot Source dropdown menu, select Volume. You should see the volume that you created previously at the bottom of the popup window. Select the volume by clicking on the arrow button to the right.
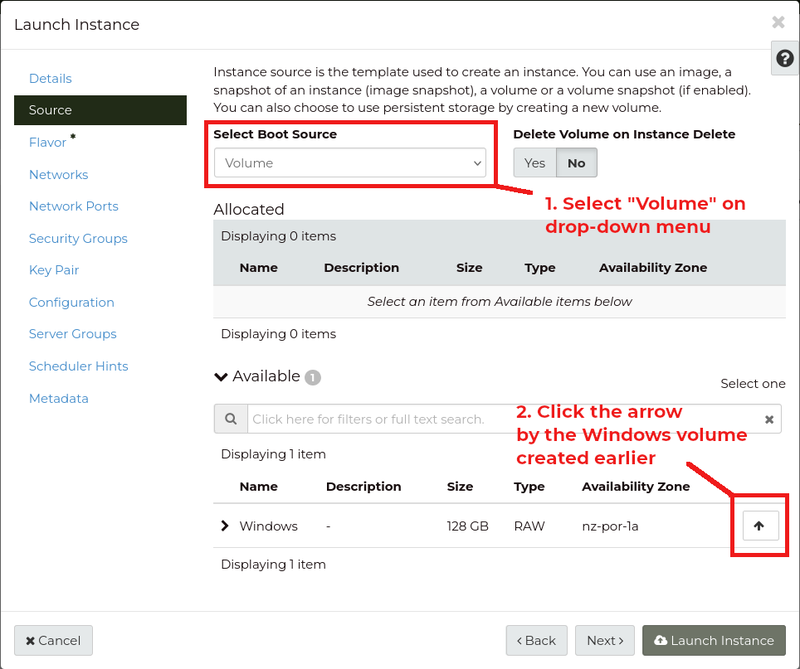
Your selection will be moved up to the Allocated area.
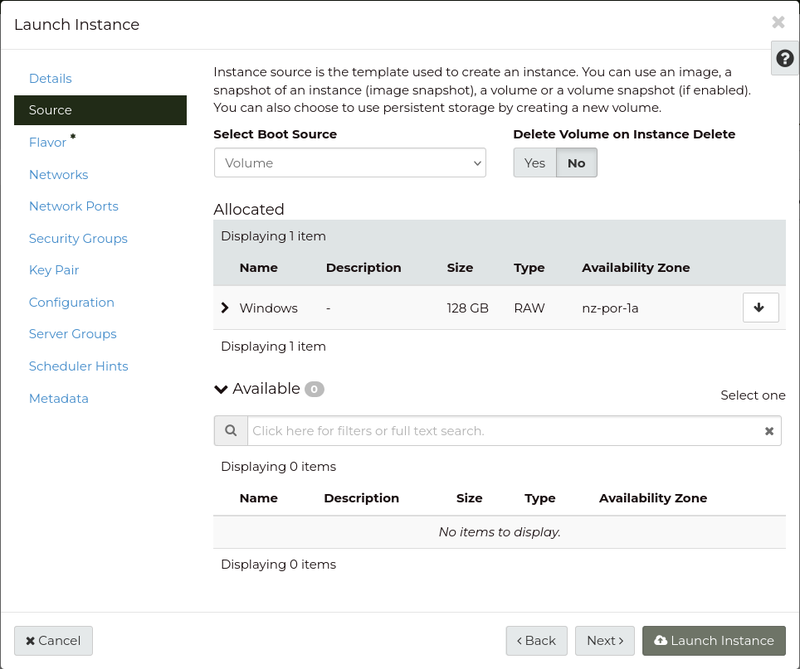
Click Next to proceed to the next section.
Flavor: Search by typing c3. into the "Availability" field and select the compute resources included in your purchased package (e.g., c3.c4r16 for a medium sized system) by clicking on the arrow button to the right of the flavor name.
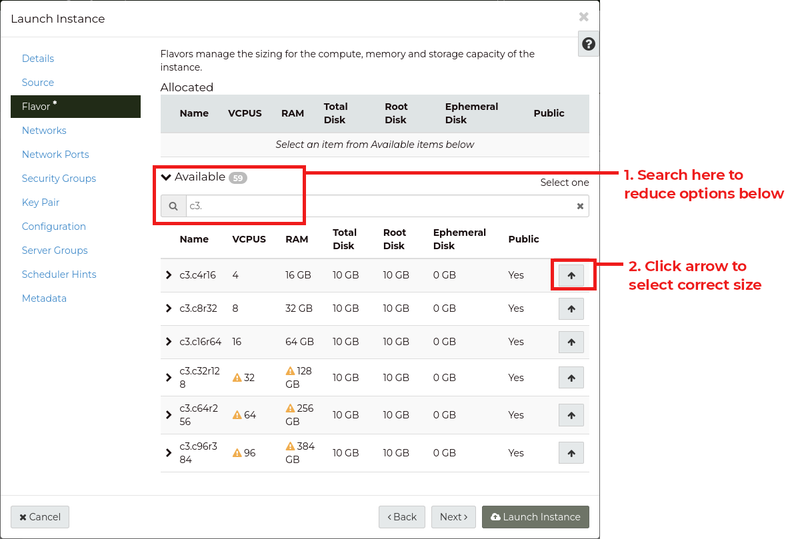
Your selection will be moved up to the Allocated area.
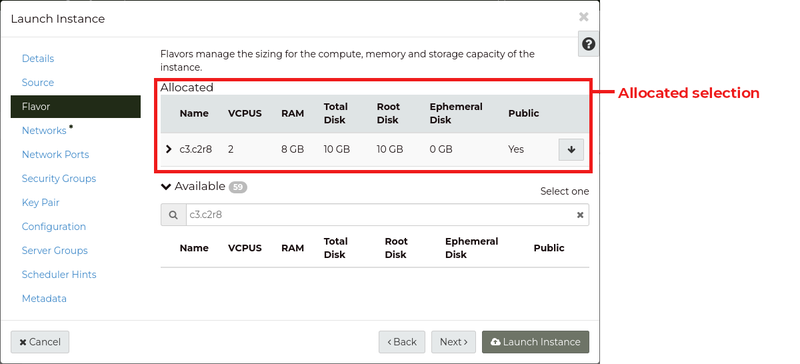
Click on Launch Instance to create the compute resource.
Add a public IP address
To allow access to the new system from elsewhere you will need to assign a public IP address to it. This is done by assigning an IP address from the IP addresses allocated to Catalyst Cloud.
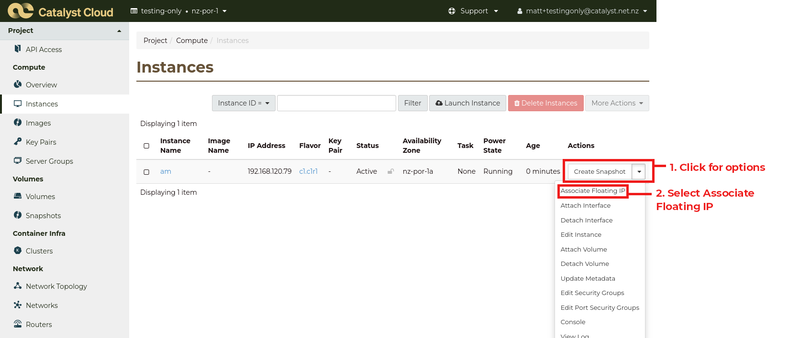
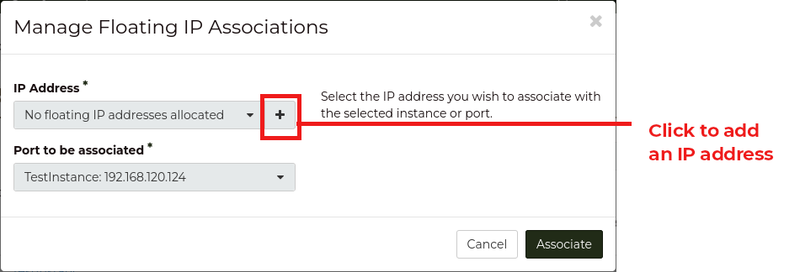
From the Instances screen, select Associate Floating IP from the drop-down menu on the right hand side of the instance information.
On the Manage Floating IP Associations pop-up window, select + next to the IP Address drop-down to add an IP address (or add a previously added floating IP address if an unused address is available).
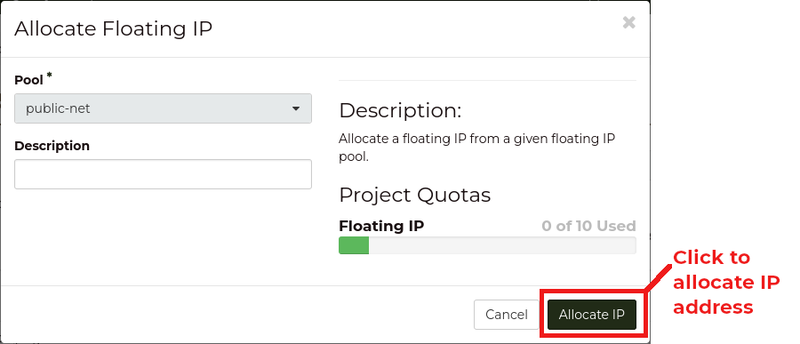
On the Allocate Floating IP pop-up window, optionally, enter description for the IP address and click the Allocate IP button.
Back on the Manage Floating IP Associations pop-up window, click the Associate button to associate the address address with your compute instance.
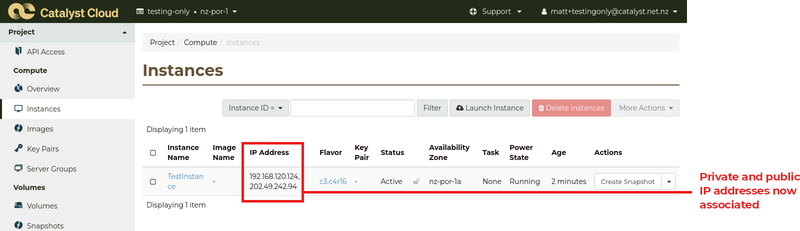
On the Instances screen, you should now see both private and public IP address for your compute instance.
Set an administrator password
If you have just created the new instance, wait until the instance displays Power State as "Running".
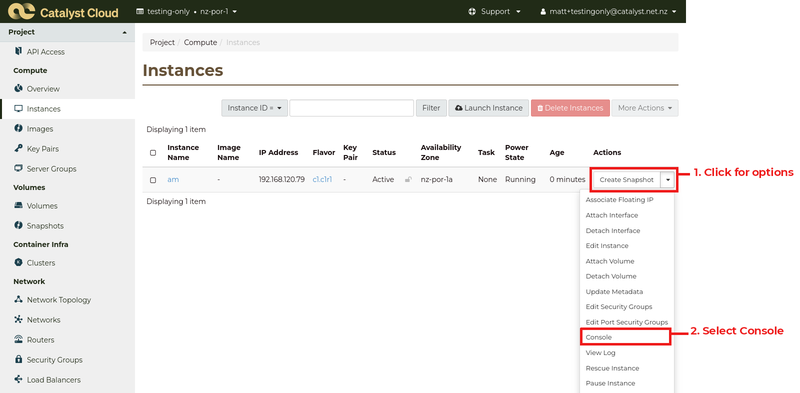
Select Console from the drop-down menu on the right hand side of the instance information.
If the login screen does not show account names, click on the Send CtrlAltDel button (top right) to begin the login process.

Scroll down to the Windows Server view and click on Administrator. You will be prompted to set a password for the Administrator account.
Your instance is now ready for installation and configuration of the required Access Management software.
Allow RDP access to your server from the internet
To configure access from a Remote Desktop connection, you need to allow access to the system from outside.
Select Security Groups link from the Network section of the menu.
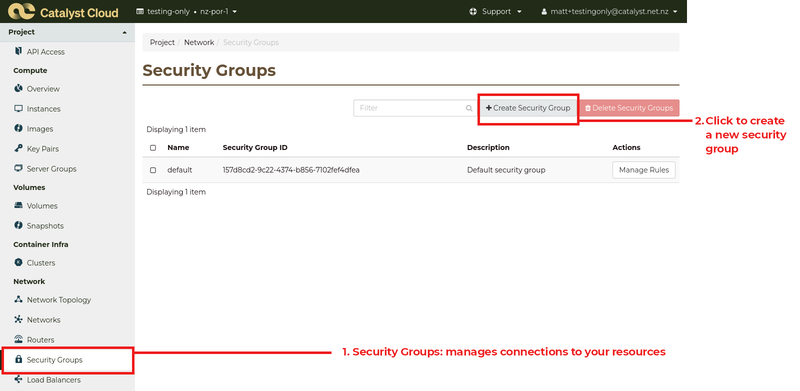
Click on the + Create Security Group button.
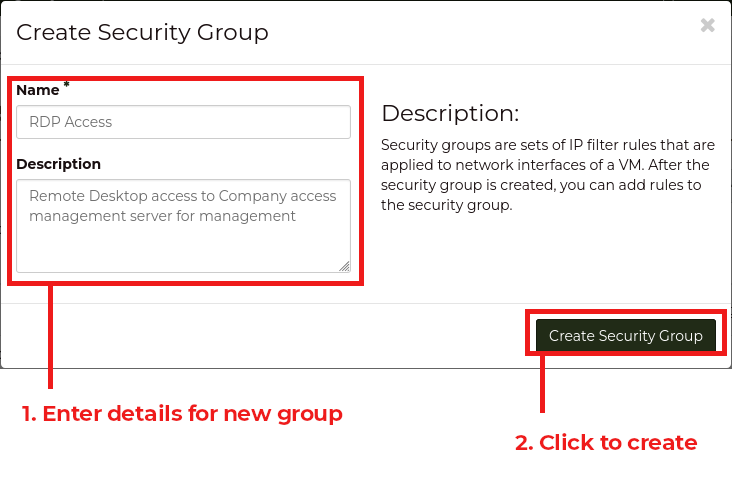
Enter a name and description for the security group to be created, then click Create Security Group.
The new Security Group is created, and you are redirected to the "Manage Security Group Rules" page for the new Security Group. The default rules to allow traffic to the internet from the server are already defined. Click on the Add Rule button to create a rule to allow access to your serving using the Remote Desktop Protocol:
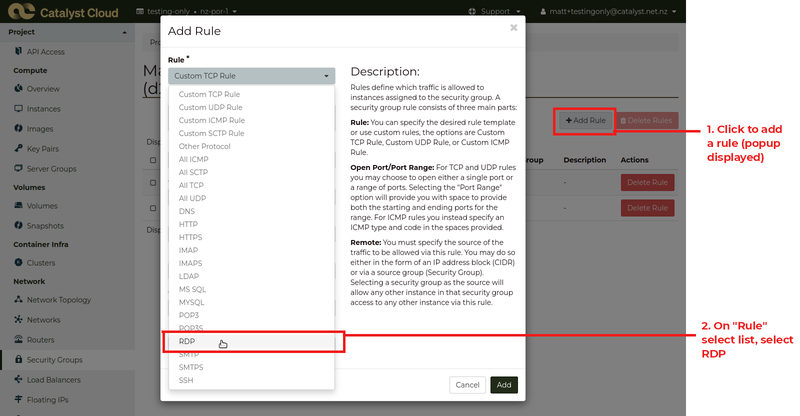
Under Rule, select "RDP" (this will change the options below)
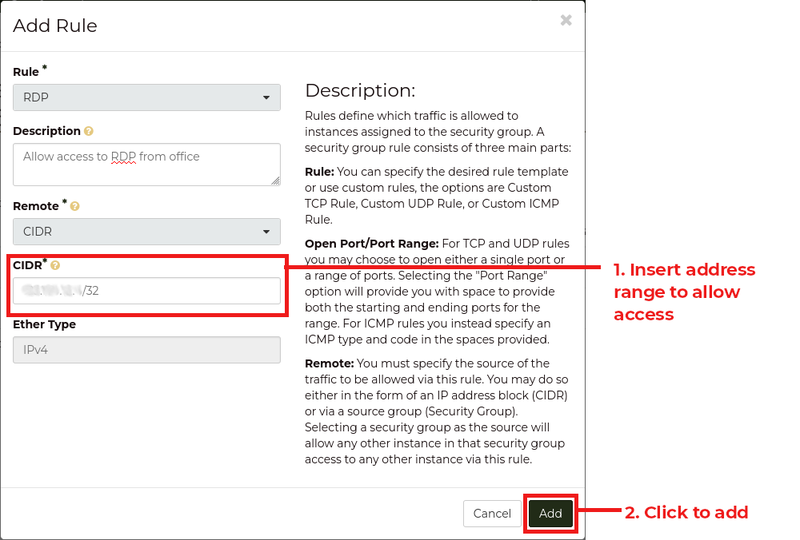
- Enter a description, e.g., "Allow access to RDP from office"
- Under Remote, select "CIDR"
- Under CIDR, enter the network that you wish to allow access from (for a single IP address, enter the IP address followed by /32; you can find the external IP address using a service such as https://whatismyipaddress.com/)
Click the Add button to add the rule to your Security Group.
You will be returned to the "Manage Security Group Rules" screen showing your new access rule. Your server's remote desktop should now be accessible from the specified remote address(es).

This will create the required rule for traffic from (Ingress) the provided IP address(es) to reach your server.
The Egress rules allow outbound traffic from your server to connect to the internet.
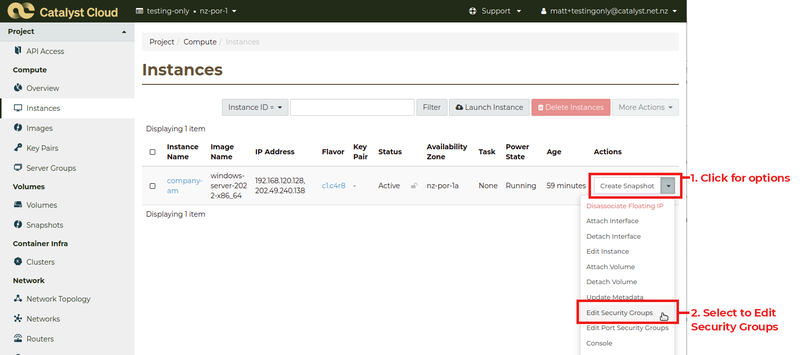
Select the Instances link from the Compute section of the menu, and select "Edit Security Groups" from the drop-down to the right of the instance details.
In the "Security Groups" tab, click the + beside your security group to add it to your instance configuration (e.g., click the + beside "RDP Access").
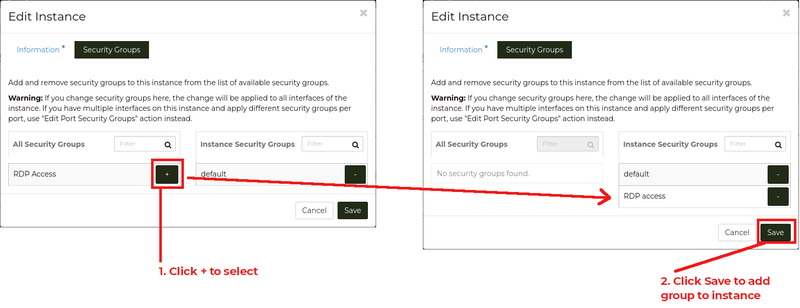
Click Save to save the changes to your instance security group.
You should now be able to access your new server by connecting to it using Remote Desktop using its IP address and the Administrator account and password that you set up.